
This concludes the two-part blog entry on turning HuggingFace into a deep learning playground (and we have not even talked about all the LMs they host!). Mostly it will be about Spaces, but we are starting with models.
Models
We train tons of models as we experiment with hyperparameters or redesign model structures and do all sorts of studies. It’s easy to lose yourself completely in all the artifacts we accumulate. HuggingFace Models repos alleviate some of this burden.
I store different model artifacts for any and all models on HuggingFace. Often, if the model is very light weight I don’t even bother to stage it in the S3 bucket for SageMaker training. One headache less. Besides the ubiquitous .from_pretained it is easy to download the model artifact in the same way we download datasets (see previous post).
cached_model_file_path = \
    hf_hub_download(model_repo, file_path_in_repo, token=auth_token)
The model will be downloaded into the cache directory locally only once (unless you change it), so next call will resolve almost instantly.
To upload model artifacts:
api = HfApi()
api.create_repo(model_repo, token=auth_token, private=True, exist_ok=True)
api.upload_file(path_or_fileobj=model_file,
                    path_in_repo=model_file_name,
                    repo_id=model_repo, token=auth_token)
A Word about Cache
HuggingFace APIs cache datasets and models in a local cache directory.
Sometimes, when you deal with a large dataset, and things take a while, you may want to take your data operations to the cloud, e.g., an AWS SageMaker Notebook instance. So, you grab a notebook instance, and with foresight, allocate an extra 300Gb of storage to it. Then you start loading the data with load_dataset and quickly find out that you have run out of storage.
This is because you have added storage as a separate volume, not the one where the dataset is being downloaded and cached!
Fortunately load_dataset as well as hf_hub_download have a cache_dir parameter, so you can redirect your cache to the volume that has enough allocated space. In the SageMaker notebook case something like /home/ec2-user/SageMaker/hf_caches could be the choice.
Spaces
Streamlit (and Gradio) were invented to let data scientists become app developers. It is essential for us to write apps if we want a way to play with our models: change parameters and see the effects, and share our results with co-workers and teams.
Streamlit (Gradio) does all this, but you still need a platform to share the app. This is the missing piece HuggingFace Spaces provide.
I have been using Streamlit for almost two years now and it is spreading more and more at Fetch, so this entry is going to be about Streamlit, but it applies to Gradio as well.
Spaces and Their Flavors
From the user perspective, a Space is a Git repo from which your application just runs. That’s all.
There are several flavors of spaces: Gradio, Streamlit, Docker, Static. Docker has a collection of templates available. In reality, since there is no magic, whatever template you pick (Gradio or Streamlit), it will still be wrapped into a Docker container which will then be launched. So, the Docker option just offers more flexibility, assuming “you know what you are doing”.
I found that while using the Streamlit option directly pretty much gives you what you want almost all the time, still flexibility may be required. In my case, I really wanted Streamlit new nested columns feature which had been released but not yet available for Streamlit Spaces, as it was only supporting v0.17 of Streamlit SDK at the time I was writing my app.
Since then, I started using Docker spaces for my Streamlit apps, because it is a rare case when you get all the flexibility with practically no cost.

Creating A Docker Space running Streamlit
Here is an example of a Streamlit Space:

And here is the same Space re-created using the Blank Docker template:

You can download these from the Files section of the Space.
Dockerfile
FROM pytorch/pytorch:1.13.1-cuda11.6-cudnn8-runtime
WORKDIR /app

COPY ./requirements.txt /app/requirements.txt
COPY ./packages.txt /app/packages.txt

RUN apt-get update && xargs -r -a /app/packages.txt apt-get install -y && \
    rm -rf /var/lib/apt/lists/*

RUN pip3 install --no-cache-dir -r /app/requirements.txt
RUN pip3 install --no-cache-dir jinja2==3.0.1
# User
RUN useradd -m -u 1000 user
USER user
ENV HOME /home/user
ENV PATH $HOME/.local/bin:$PATH

WORKDIR $HOME
RUN mkdir app
WORKDIR $HOME/app
COPY . $HOME/app

EXPOSE 8501
CMD streamlit run app.py
This is pretty much boilerplate. The only thing I had to add is on line 11. For some reason, my app was refusing to run on a lesser version of jinja2. I have not seen it in other examples, so perhaps it is no longer necessary.
On line 23 we expose the port on which Streamlit apps run by default and on line 24 we launch it, assuming our code is in app.py.
Also, I am using PyTorch with CUDA as a base container, but really anything that makes sense could be used.
README.md
In the world of Spaces, README describes some key parameters that determine how the Space is run. In particular:
sdk: docker
app_port: 8501
Other settings are related to appearance, but the 2 above are the most important.
config.toml
Under the .streamlit folder, this file describes appearances but also some key application properties:
[theme]
primaryColor="#e5ab00"
font="sans serif"

[server]
maxUploadSize = 200
enableXsrfProtection = false
[theme] section gives your app the HuggingFace themed look and feel, while the [server] section ensures the Streamlit file upload feature works.
requirements.txt
Specify everything you need there. E.g., a version of streamlit newer than the one supported by streamlit spaces.
I have also found out recently, that the latest version of HuggingFace datasets API (2.14.2) does not work in Streamlit Docker containers. Specify 2.13.1 if using datasets:
streamlit==1.24.1
datasets==2.13.1
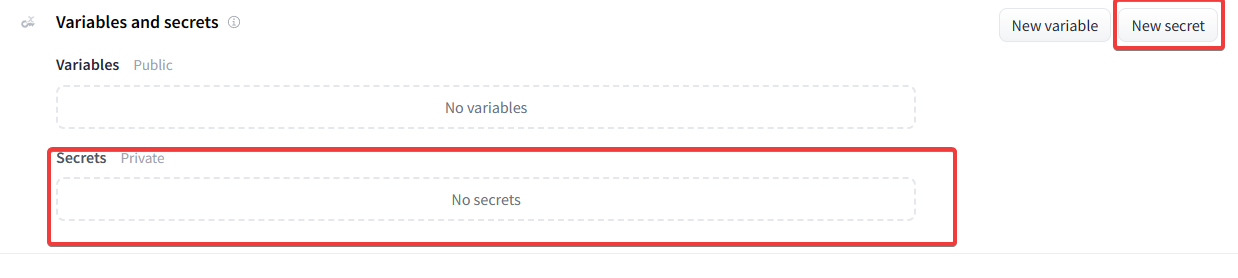
HuggingFace Token and Other Secrets
You will definitely need your secret token in order to pull data and models in the HuggingFace Spaces.
For this, you can set private environment variables in your Space on its Settings page
Local Debugging and Testing
You can first debug your app locally as you would a regular Streamlit app (e.g., using VSCode facilities to attach a debugger).
I usually put these lines somewhere at the top of my app.py:
try:
    import ptvsd
    ptvsd.enable_attach()
    ptvsd.wait_for_attach()
except:
    pass
I don’t distribute ptvsd to the Space environment, so the exception will always be caught and supressed, while in my local environment the app will pause and wait for debugger to be attached.
VSCode launch.json entry for debugging looks like this:
{
    "name": "Streamlit",
    "type": "python",
    "request": "attach",
    "connect": {
        "host": "localhost",
        "port": 5678
    },
    "pathMappings": [
        {
            "localRoot": "${workspaceFolder}",
            "remoteRoot": "."
        }
    ],
    "justMyCode": false
}
For docker – I simply build:
docker build -t my_space .
To make sure everything runs:
docker run --rm -p 8501:8501 my_space
Or, if I want to examine the insides of the container:
docker run -it --rm my_space /bin/bash
Conclusion
While my HuggingSpace lab doesn’t solve all the problems, it takes a ton of headaches away. Now, every time I start a new project, it is as if I am 30% done, because I know where my data is going to be stored and what API I will use to access it, how I will deal with artifacts and how I will observe and share my experiments. I know I am not tied to any particular environment, but wherever I go, my data and my models will follow.
Perhaps this will make your life a bit easier as well.
