Source code for the finished project is here.
NVIDIA TensorRT is a framework used to optimize deep networks for inference by performing surgery on graphs trained with popular deep learning frameworks: Tensorflow, Caffe, etc.
Preparing the Tensorflow Graph
Our code is based on the Uff SSD sample installed with TensorRT 5.0. The guide together with the README in the sample directory describe steps to take to convert the frozen Tensorflow graph to the UFF format used by TensorRT. Follow these steps to create a UFF file from the Tensorflow frozen graph.
OpenCV GPU to TensorRT Input
We already have sample code dealing with Inception V2 SSD, we have created a TensorRT parsable graph from our Tensorflow graph, we can decode video on the GPU using OpenCV. The only major challenge left is to format decoded frames stored in GpuMat structure to TensorRT input requirements.
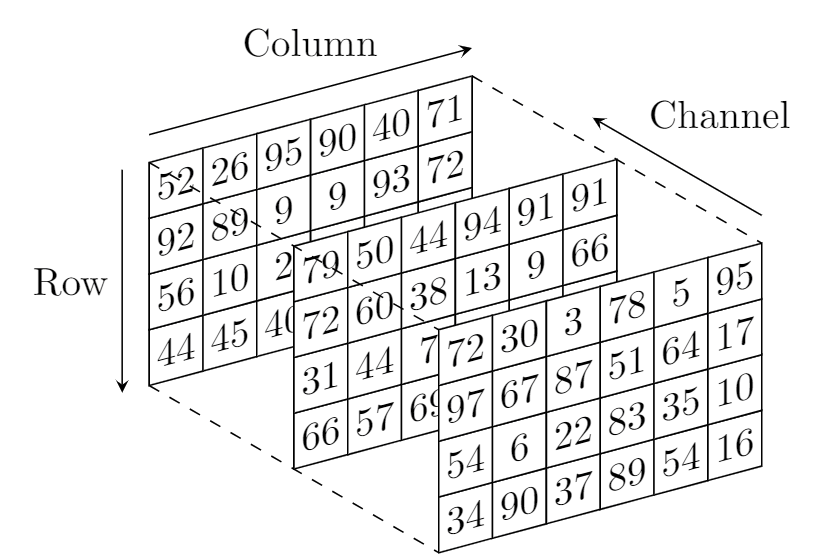
This is a good opportunity for a segue on how images are stored in memory. Abstracting the low-level memory, OpenCV stores them in the channel last formatted structure: HWC (Height, Width, Channel). cuDNN used by TensorRT is optimized for the channel first format (CHW). Regardless, our consciousness stores them as 3 parallel planes in a 3d space joining together into one image, so we don’t really care about actual formats as long as the tools let us operate within this abstraction.
Eventually, however, we need to flatten all of this data into a 1d sequence which is our real-world address space. At this moment we need to agree on the order in which elements are marshaled. In numpy as well as C/C++, it is the “last-dimension-first” order. So, if we are storing things the TensorRT way, we wrap columns, then rows, then channels. The first picture below is roughly visualizing this process. In this case, images look like 3 different RGB (HSV, etc) planes flattened into one dimension fairly intuitively.
In the OpenCV world (channel-last, so channel will be the fastest changing dimension to get wrapped) the image below roughly shows the order of this 3d -> 1d mapping. You can think of it as each plane of the bottom image representing one image matrix row, of which each column consists of a three member tuple of channel values:
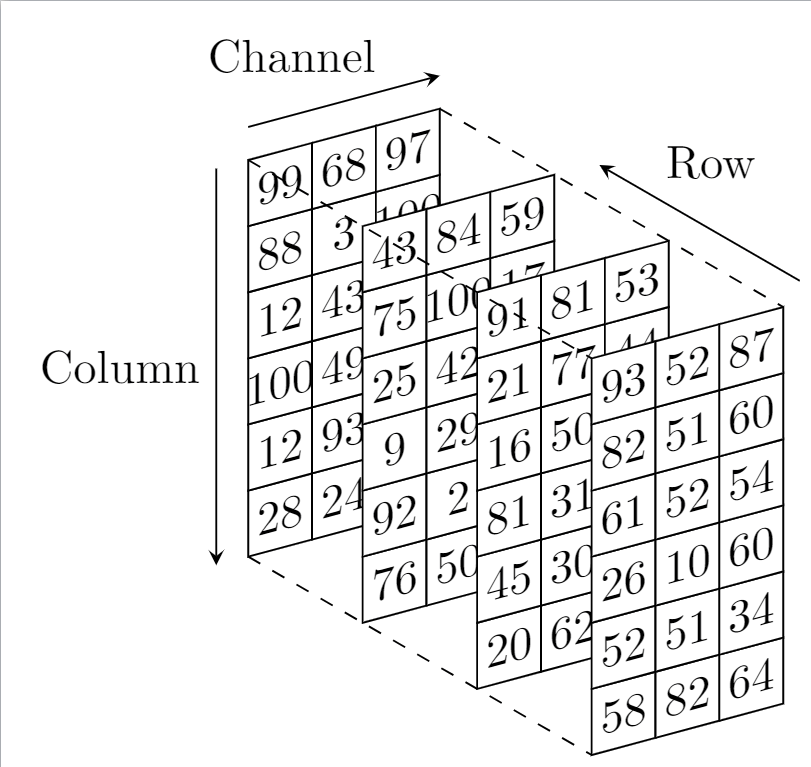
This is kinda unnatural however we don’t care ever due to the 3d abstraction in Python (or Mat or GpuMat abstractions in C++). We only start caring when we need to step outside of the boundaries of our framework of choice (OpenCV). This is one of such cases.
CUDA kernels make quick work of these types of conversions, so we barely give back any of our performance gains (the decoded frame is already on the GPU). We are normalizing the frame for our network making sure each value is in [-1, 1], while we are rearranging the bytes.
We get an impressive performance boost to 143 fps. Almost reached our original goal of an order of magnitude speedup over basic Python.
INT8 Precision Mode
In order to finally nail the goal of a ten-fold performance increase we need to run our TensorRT graph with INT8 precision. You can do a trial run with ride_2.mp4.
INT8 mode requires calibration before running, which will be attempted automatically when running the app if calibration table file is not found in the application current directory.
There is a calibration table already present in the source directory so running on the provided sample video does not requite calibration.
If you want to run on your set videos, you may need to run your own calibration first.
Performing Your Own Calibration
NOTE I recommend changing the ownership of the /usr/src/tensorrt directory to you for convenience: chown <you> -R /usr/src/tensorrt
To calibrate on a subset of videos:
- Extract a few frames from each of the chosen videos in PPM format into
/usr/src/tensorrt/data/ssd/. - Resize them to 300×300 (size of our input tensor)
- Pick a subset of frames at random and merge their file names without extension into
/usr/src/tensorrt/data/ssd/list.txt, one name per line. - Run the application as usual but do it from
/usr/src/tensorrtdirectory, so it is set as the application current directory. Sample code, which I have not changed, relies on hard coded locations – definitely needs fixing.
The following script performs required transformations for a single video. You can run it over a set of videos. NVIDIA recommends at least 500 frames for calibration.
ffmpeg -i ride_1.mp4 -vf fps=3,scale=300:300 /usr/src/tensorrt/data/ssd/ride_1_0%4d.ppm
ls -1 /usr/src/tensorrt/data/ssd/ \
| grep ride_1_ \
| sort -R \
| tail --line=200 \
| sed -e s'/\..*$//' >>/usr/src/tensorrt/data/ssd/list.txt
Size of calibration dataset as well as how it is split into batches is controlled by the constants in infer_with_trt.cpp (lines 25 and 26). the current settings indicate calibration will be performed on 2 batches of 50.
static constexpr int CAL_BATCH_SIZE = 50;
static constexpr int FIRST_CAL_BATCH = 0, NB_CAL_BATCHES = 2;
Calibration takes a fairy long time so, no need to panic if the app appears unresponsive. Once calibration succeeds it outputs CalibrationTableSSD in the application directory which is then read on every consecuitive execution.
Final Result
At 200 fps on the calibrated dataset, we have achieved our goal of an order of a magnitude performance improvement over the basic Python detector.


One thought on “Supercharging Object Detection in Video: TensorRT 5”